Vue 使用 Vitest 进行单元测试
单元测试的定义
本文源码: https://github.com/Ray-D-Song/vitest-tutorial-sourcecode
单元测试(英语:Unit Testing)又称为模块测试 [来源请求] ,是针对程序模块(软件设计的最小单位)来进行正确性检验的测试工作。程序单元是应用的最小可测试部件。在过程化编程中,一个单元就是单个程序、函数、过程等;对于面向对象编程,最小单元就是方法,包括基类(超类)、抽象类、或者派生类(子类)中的方法。 ———wiki
在一个典型的 Vue 项目中, 我们经常需要进行单元测试的模块包括以下几种:
- hooks
- 工具函数 (utils)
- 校验规则 (reg)
- 脚手架 (bin/scaffold)
- 自定义 vue 指令
- 全局状态 (store)
初始化 Vitest
安装 Vitest
pnpm add -D vitest
Vitest 默认和 Vite 配置集成, 不需要额外的配置文件.
修改package.json, 在script下新增test:unit命令
  "scripts": {
    ...
    "test:unit": "vitest",
  },
编写测试用例
测试一个手机号校验函数
/** /reg/phone.ts */
// 校验是否国内手机号
export function regChinesePhoneNumber(phoneNumber: string) {
  const regex = /^1[3456789]\d{9}$/
  return regex.test(phoneNumber)
}

/** /reg/phone.test.ts */
import { describe, expect, test } from 'vitest'
import { regChinesePhoneNumber } from '../phone'

describe('phone', () => {
  test('phone number belongs to Chinese', () => {
    expect(regChinesePhoneNumber('17725663831')).toBe(true)
  })
})
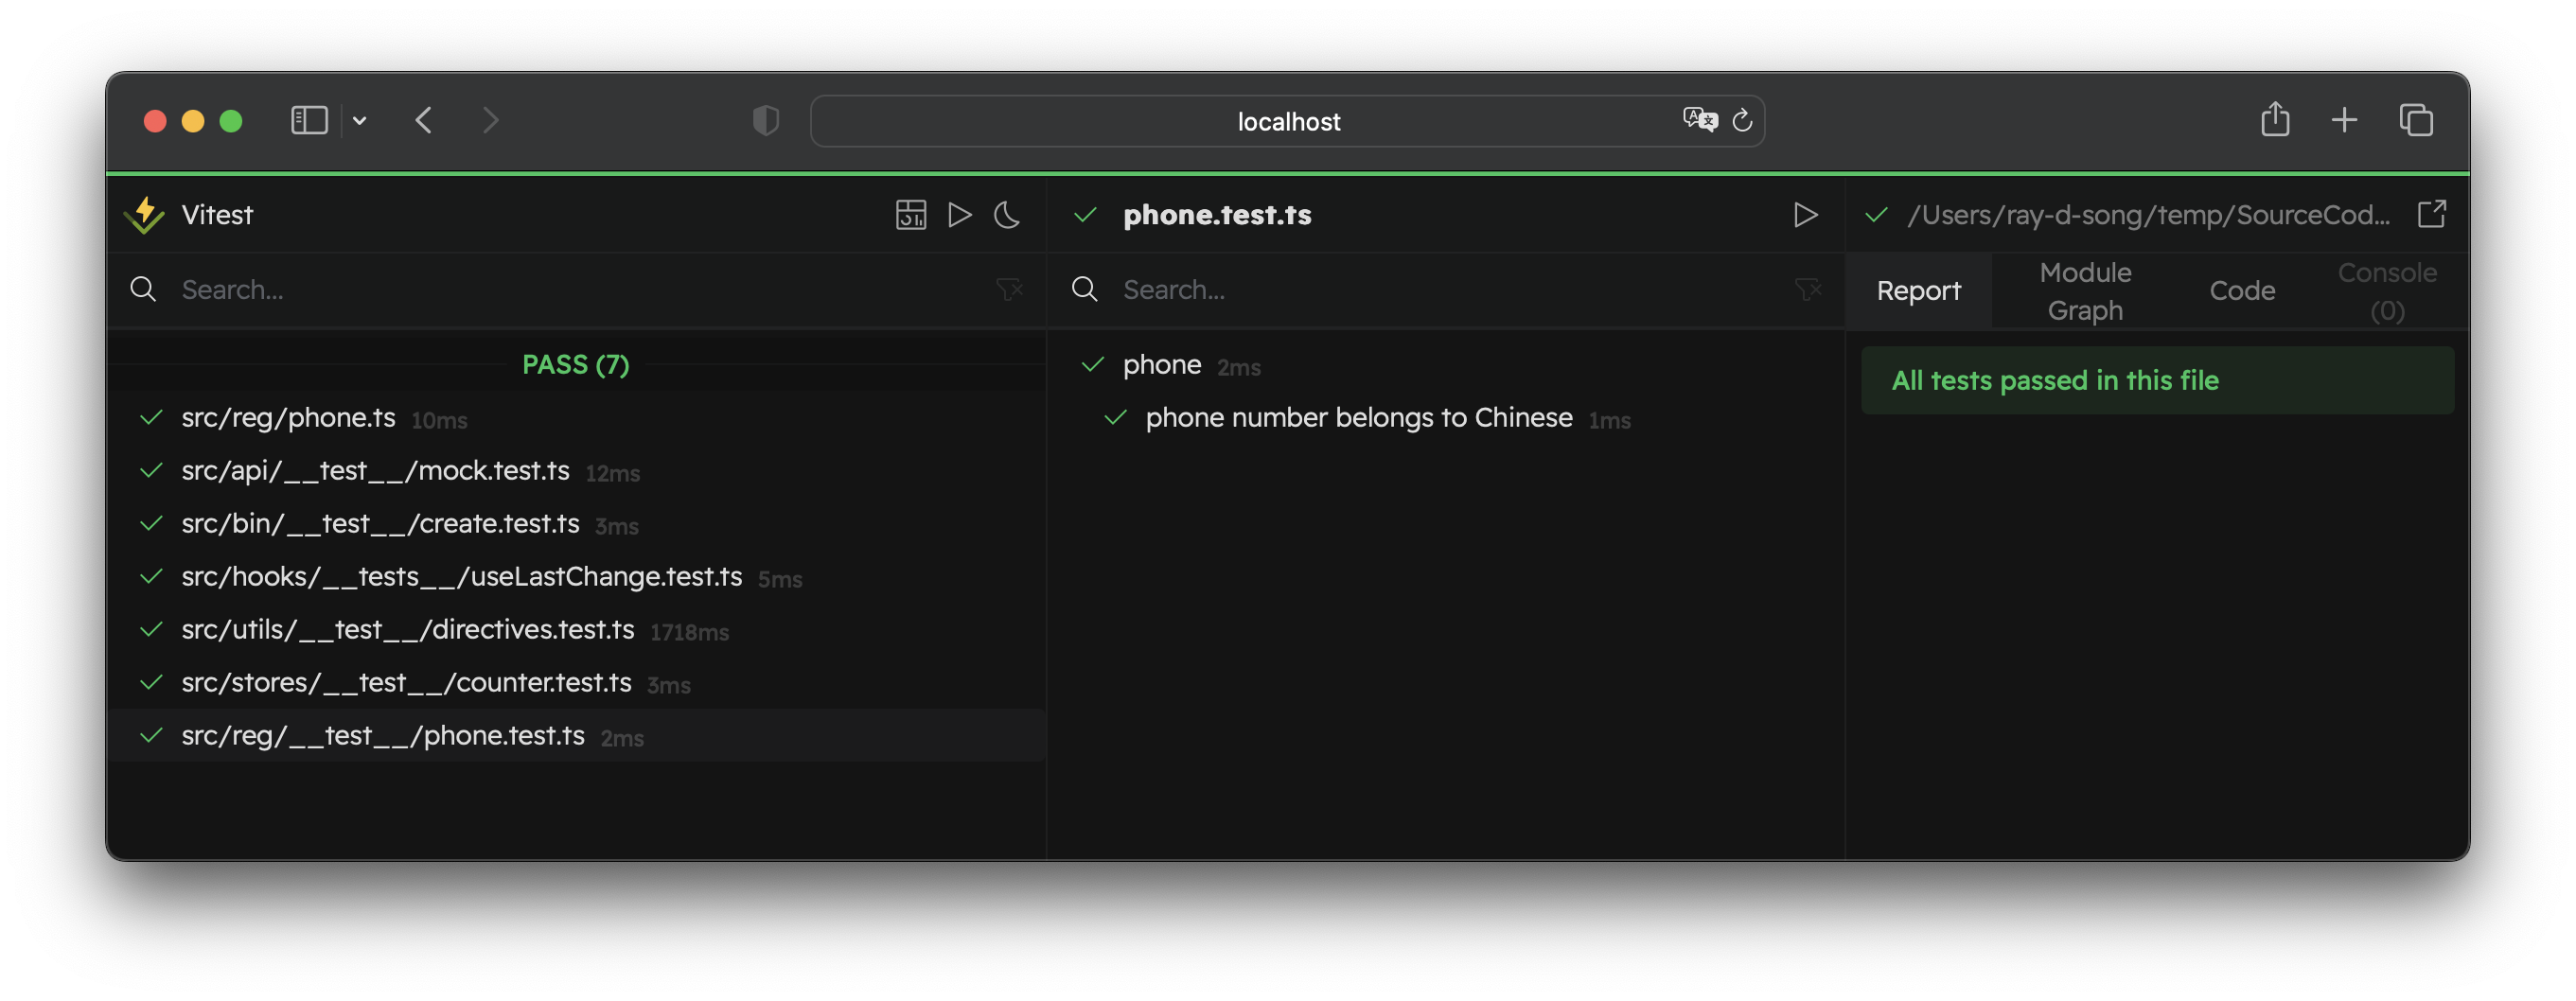
输入命令npm run test:unit, 不出意外你会看到以下内容, 表明测试通过:

编写测试的代码文件通常放置在__test__文件夹中, 命名为xxx.test.ts或xxx.spec.ts, Vitest 会自动运行所有此类命名的文件.
编写测试的基础是describe、test、expect关键字.
describe 用于定义一个测试套件, 套件类似于 js 的模块, 用于将多个 test 封装到一起, 搭配skip、only等 api 可以实现选择性测试等功能.
test 用于声明一个测试, 接收测试名称和保存测试期望的函数.
expect 用于设置断言, Vitest 默认提供基于chai的断言, 你不知道什么是 chai 没关系, 断言是单元测试的关键助手, 后面会详细介绍
实践
接下来, 我们对几种常见的场景进行单测
hooks
hooks 是逻辑的封装, 是最需要单测的场景.
编辑器和表单有一个常见需求是记录上一次更改时间, 我们可以通过几行代码封装一个 hooks.
/** /src/hooks/useLastChange.ts */
import { watch, ref, type WatchSource } from 'vue'
import moment from 'moment/moment'

export function useLastChange(source: WatchSource) {
  const lastChange = ref('')

  watch(source, () => {
    lastChange.value = moment().format('YYYY-MM-DD HH:mm:ss')
  })

  return lastChange
}

/** /src/hooks/__test__/useLastChange.test.ts */
import { expect, it } from 'vitest'
import { nextTick, ref } from 'vue'
import { useLastChange } from '../useLastChange'

it('update lastChange when source changes', async () => {
  const source = ref('')
  const lastChange = useLastChange(source)
  const snapShot01 = lastChange.value
  source.value = 'Ray'
  await nextTick()
  const snapShot02 = lastChange.value

  expect(snapShot01).not.toBe(snapShot02)
})
hooks 的测试比较简单, 就是执行后比对结果. utils 和 reg 也是类似, 此处略过.
scaffold
脚手架一般是框架自身提供的命令行工具, 用于生成模板代码, 放置于 bin 目录.
Vue 和 React 自身只提供了创建项目工具, 没有提供类似 Rails Command Line 的项目搭建工具. 因此前端spa项目的脚手架都是自己针对常见业务场景的封装.
脚手架一般通过 npm 命令执行, 在 package.json 中添加一条命令
"create": "node ./bin/create.js --type=$npm_config_type --path=$npm_config_path
运行npm run create --type=table --path='/Users/ray-d-song/temp/SourceCode/vitest-tutorial-sourcecode/src/views/TestTable.vue' , 就会执行 /bin/index 脚本中的内容并将 type 和 path 值作为参数传递.
编写 create 脚本:
/** /src/bin/create.js */
import minimist from 'minimist'
import { readFileSync, writeFileSync } from 'fs'

function main() {
  // 使用 minimist 处理参数
  const args = minimist(process.argv.slice(2))
  const { type, path } = args
  let temp = ''
  if(type === 'table') {
    temp = readFileSync('./src/bin/dist/table', 'utf-8')
  }
  writeFileSync(path, temp)
  console.log('\n创建完成')
}

main()
脚手架其实只进行 3 个操作, 获取参数, 读取对应的模板, 创建目标文件.
vitest 和 jest 并没有比较好的执行 npm 命令的方法, 因此我们要对上面的方法稍加改造:
/** /src/bin/create.js */
import { readFileSync, writeFileSync } from 'fs'

function create(args) {
  const { type, path } = args
  let temp = ''
  if(type === 'table') {
    temp = readFileSync('./src/bin/dist/table', 'utf-8')
  } else {
    throw '当前仅支持生成 table 类型'
  }
  writeFileSync(path, temp)
  console.log('\n创建完成')
}

export default create

/** /src/bin/index.js */
import create from './create'

// 使用 minimist 处理参数
const args = minimist(process.argv.slice(2))
try {
  create(args)
} catch(e) {
  console.log(e)
}
将脚本入口和执行方法分离是为了防止 unit test 过程中自动执行 main 方法报错.
接下来我们就可以在 test 中导入 create 方法进行测试. 断言可以通过读取生成的模板内容和 table 文件中内容进行比较.
以下是测试用例, 从参数、生成内容进行测试
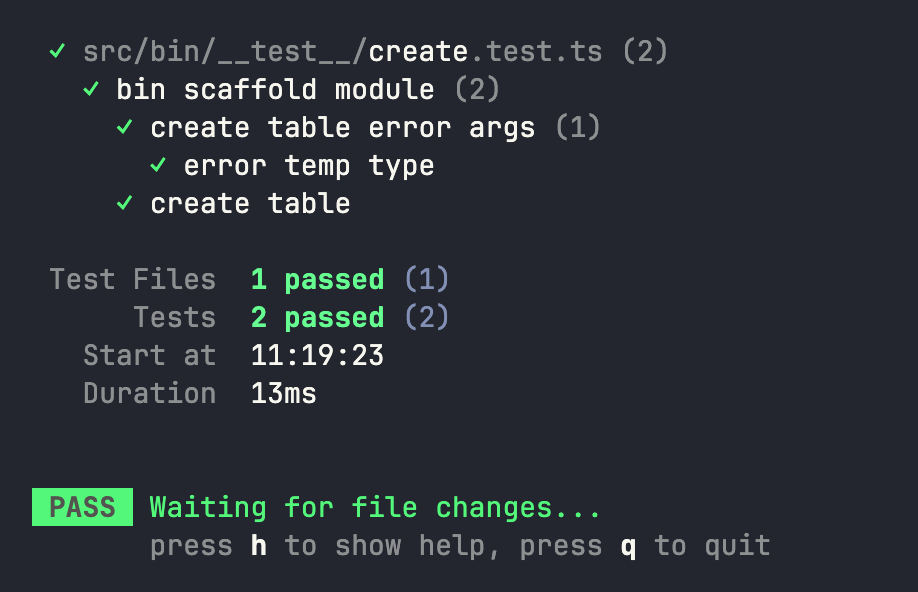
/** /src/bin/__test__/create.test.ts */
import create from '../create'
import { describe, expect, it } from 'vitest'
import { readFileSync } from 'fs'

describe('bin scaffold module', () => {

  describe('create table error args', () => {
    it('error temp type', () => {
      try {
        create({
          type: 'dialog',
          path: '/Users/ray-d-song/temp/SourceCode/vitest-tutorial-sourcecode/src/bin/__test__/dialog.vue'
        })
      } catch(e) {
        expect(e).toBe('当前仅支持生成 table 类型')
        const product = readFileSync('/Users/ray-d-song/temp/SourceCode/vitest-tutorial-sourcecode/src/bin/__test__/dialog.vue', 'utf-8')
        expect(product).toBeUndefined
      }
    })
  })

  it('create table', () => {
    create({
      type: 'table',
      path: '/Users/ray-d-song/temp/SourceCode/vitest-tutorial-sourcecode/src/bin/__test__/table.vue'
    })
    const temp = readFileSync('/Users/ray-d-song/temp/SourceCode/vitest-tutorial-sourcecode/src/bin/dist/table', 'utf-8')
    const product = readFileSync('/Users/ray-d-song/temp/SourceCode/vitest-tutorial-sourcecode/src/bin/__test__/table.vue', 'utf-8')
    expect(temp).toBe(product)
  })

})
自定义 Vue 指令
自定义一个 v-debounce, 用于给按钮增加防抖效果
import _ from 'lodash'

const vDebounce = {
  beforeMount(el: HTMLElement, binding: {value: () => void}) {
    el.addEventListener('click', _.debounce(binding.value, 600))
  }
}

app.directive('debounce', vDebounce)
为了测试这个指令, 我们需要模拟组件挂载->用户点击->方法调用的过程, 也就是我们需要调用部分组件测试的能力. @vue/test-utils 是常用的 Vue 组件测试库.
pnpm install @vue/test-utils
vue-test-utils 兼容 jest 和 Vitest, 安装后可以直接使用. 下面是自定义指令的功能测试:
/** /src/utils/__test__/directives.test.ts */
import { describe, expect, it } from 'vitest'
import { defineComponent, nextTick, ref } from 'vue'
import { mount } from '@vue/test-utils'
import { vDebounce } from '../directives'

// 使用 defineComponent 定义测试组件
// 该 api 除了 template 作为字符串传递外
// 还可以使用 tsx 获得更好的代码提示
const tc = defineComponent({
  setup() {
    const num = ref(0)
    function add() {
      num.value++
    }
    return {
      num,
      add
    }
  },
  template: '<button v-debounce="add">num: {{num}}</button>'
})

describe('custom directives', async () => {
  // vue-test-utils 的 mount api, 将组件实例化
  it('debounce submit', async () => {
    const wrapper = mount(tc, {
      global: {
        directives: {
          debounce: vDebounce
        }
      }
    })

    // 每过 200 毫秒点击一次 button
    const interval = setInterval(async () => {
      // find api 查找目标元素
      await wrapper.find('button').trigger('click')
    }, 200)
    // 阻塞 1000 秒, 让点击事件在 1 秒内执行 4 次
    await new Promise(resolve => setTimeout(resolve, 1000))

    clearInterval(interval)

    // 阻塞 700 秒, 等待函数执行
    await new Promise(resolve => setTimeout(resolve, 700))
    // 确保组件重新渲染
    await nextTick()
    // 获取目标元素
    const btn = wrapper.get('button')
    // 对目标元素的文本进行断言
    expect(btn.text()).toBe('num: 1')
  })
})
store
大型的前端项目基本都会用到全局的状态管理库, Vue3 最流行的是 Pinia.
Pinia 提供了可用于测试的 api.
import { createPinia, setActivePinia } from 'pinia'
import { beforeEach, describe, expect, it } from 'vitest'
import { useCounterStore } from '../counter'

describe('Counter Store', () => {
  beforeEach(() => {
    setActivePinia(createPinia())
  })

  it('increments', () => {
    const counter = useCounterStore()
    expect(counter.count).toBe(0)
    counter.increment()
    expect(counter.count).toBe(1)
  })
})
这里引入了一个新的 api: beforeEach, 这是一种测试生命周期钩子, 传入的方法在每个测试用例之前执行.
我们传入了 pinia 的 setActivePinia api, 这是个 SSR 经常使用的 api, 用户设置一个激活的 Pinia 实例.
断言
断言是单元测试的核心, 本质一堆用来判断结果的函数库.
在上面的例子, 我们使用了toBe断言, 这是最常用的断言, 该断言用于判断值相等或者相同引用, 类似于Object.is.
以下为常用的几种断言:
| 断言 | 功能 |
|---|---|
| not | 取反 |
| toBe | 判断值或对象引用是否相同 |
| toEqual | 判断对象值是否相同 |
| toBeGreaterThan | 大于 |
| toBeGreaterThanOrEqual | 大于等于 |
| toBeLessThan | 小于 |
| toBeLessThanOrEqual | 小于等于 |
| soft | expect.soft 遇到某条用例失败也不会停止测试, 直到所有用例执行完毕展示所有错误 |
| toBeTypeOf | 断言类型是否相同 |
| toBeInstanceOf | 判断是否是目标类的实例 |
| toStrictEqual | 严格相等, 会检查具有 undefined 属性的 key、数组稀疏性、对象类型是否相等 |
| toContain | 检查数组元素和子串 |
| toThrowError | 检查函数调用过程中是否报错 |
| resolves | expect(func()).resolves.toEqual |
| rejects | expect(func()).rejects.toThrow |
mock
为了应对业务耦合, 做到仅测试功能代码, 我们可以使用 mock 工具进行数据模拟.
最常见的场景是模拟请求, 一般情况下你可以自己用一个 Promise 来模拟请求结果, 但有些情况也许你需要更真实的场景.
常用的 mock 工具, 例如 APIfox, 是通过接口定义来「启动一个真实的服务器返回假数据」. 而 Vitest 并不会启动真正的 node 服务器, 而是通过mswjs来拦截对应地址的请求.
也就是说你可以很方便的去模拟「异常请求」的场景.
首先安装 msw: pnpm install msw
假设我们需要请求https://thorn.mock/test这个接口, 获取{msg: 'hey'}的 json 数据, 以下是我们的测试用例.
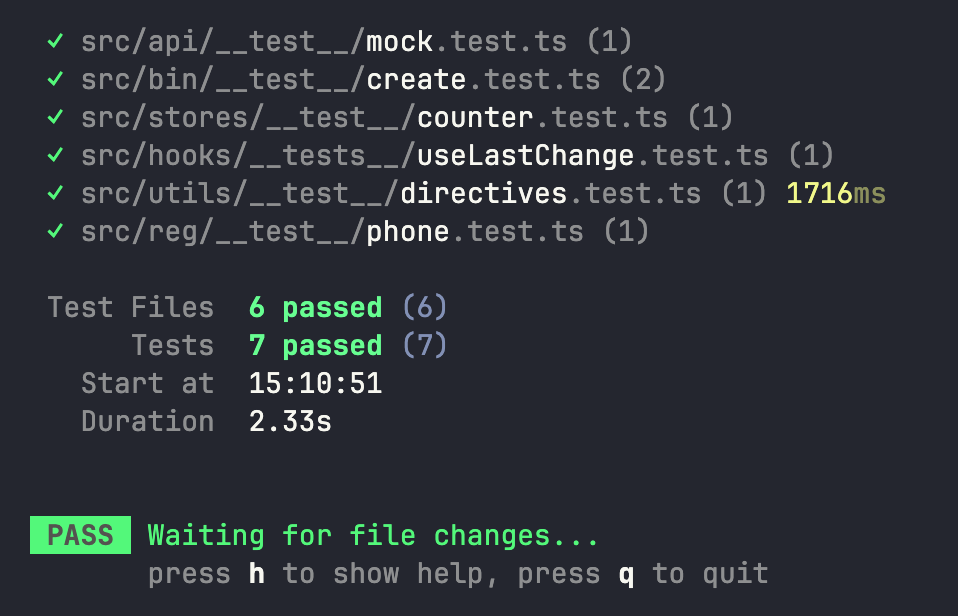
/** /src/api/__test__/mock.test.ts */
import { describe, expect, it } from 'vitest'

describe('mock', async () => {
  it('mock api', async () => {
    const response = await fetch('https://thorn.mock/test')
    // 使用 toEqual 来比较对象值
    expect(await response.json()).toEqual({
      msg: 'hey'
    })
  })
})
为了 mock 这个接口, 我们需要按照 msw 的语法编写一个 server.
/** /src/mocks/server.ts */
import { setupServer } from 'msw/node'
import { HttpHandler, HttpResponse, http } from 'msw'

export const handlers: Array<HttpHandler> = [
  http.get('https://thorn.mock/test', () => {
    return HttpResponse.json({
      msg: 'hey'
    })
  })
]

export const server = setupServer(...handlers)
理想状况下, 我们希望每一次测试开始都启动 mock 服务器, 测试结束将服务关掉, Vitest 提供了四个 api 来实现这个过程.
在 Vitest.config.ts 中, 添加 setupFiles 选项, 该选项接受string|string[]作为文件路径, 写入的文件每次 Vitest 启动都会自动执行.
defineConfig({
  test: {
    // ...
    setupFiles: './src/setup.ts'
    // ...
  }
})
在 setup.ts 文件中, 我们调用 Vitest 钩子:
import { server } from './mocks/server'
import { beforeAll, afterAll, afterEach } from 'vitest'

// 在每一次测试开始前开启服务器
beforeAll(() => server.listen({ onUnhandledRequest: 'error' }))
// 在每一次测试结束后关闭服务器
afterAll(() => server.close())
// 在每一个用例结束后重置 handlers
afterEach(() => server.resetHandlers())
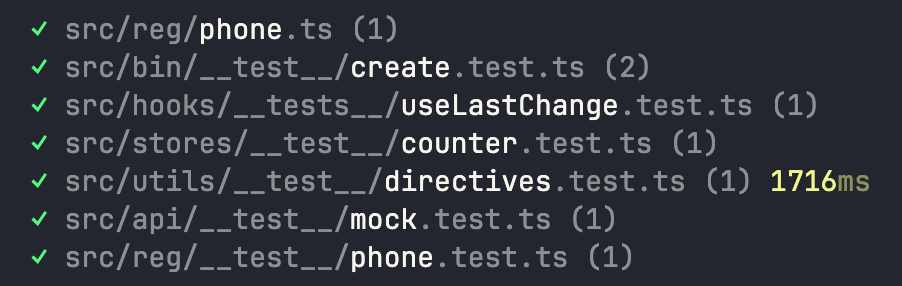
开启测试, 会显示测试已通过.
 请注意, 因为 msw 的作用是拦截请求而不是开启模拟服务器, 因此直接本地调用并不起作用.
异步测试
优化测试过程
内联测试
就和内联样式表一样, 所谓内联测试就是将测试代码和源码写在一起.
改造一下正则表达式的例子:
/** /src/reg/phone.ts */
export function regChinesePhoneNumber(phoneNumber: string) {
  const regex = /^1[3456789]\d{9}$/
  return regex.test(phoneNumber)
}

// 内联测试应该放在源码的底部
/**
 * 为了解决 ts 报错
 * 需要在 tsconfig.json 中添加
 * {"compilerOptions": {"types": ["vitest/importMeta"]}}
 */
if(import.meta.vitest) {
  const { it, expect } = import.meta.vitest
  it('phone number belongs to Chinese', () => {
    expect(regChinesePhoneNumber('41772566381')).toBe(false)
  })
}
随后更新一下vitest.config.ts.
export default defineConfig({
  test: {
    includeSource: ['src/**/*.{js,ts}'],
  }
})
可以看到新运行的用例增加了一个非test.ts结尾的文件.
 这样做的缺点是会造成打包后的代码体积膨胀, 但我们可以做一些处理让代码块作为不会被执行的区块被 tree-shake 掉.
/** vite.config.ts */
export default defineConfig({
  define: {
    'import.meta.vitest': 'undefined',
  },
})
类型测试 (Experimental)
ts 的类型在编译后会被擦除, 也就是说无论类型代码写的有多完备, 对真正运行的 js 代码并不会有影响. 但通过类型测试可以促使类型代码更sound, 以此提高 ts 项目的强健性.
不过总的来说类型测试并不常用, 此处仅介绍一下一般流程.
/** /src/types/MPick.d.ts */
// 实现一个自己的 Pick 方法
export type MPick<T, K extends keyof T> = {
  [P in K]: T[P]
}

/** /src/types/__test__/MPick.test-d.ts */

// vitest 会自动扫描 .test-d.ts 命令的文件
import { expectTypeOf, test } from 'vitest'
import type { MPick } from '../MPick'

test('test mock Pick', () => {
  interface Foo {
    a: string
    b: number
  }
  type Bar = MPick<Foo, 'a'>
  interface Exp {
    a: string
  }
  expectTypeOf<Bar>().toEqualTypeOf<Exp>()
})
为了启动类型测试, 需要在启动时指定 —typecheck, 添加一个新的 npm 命令 "test:type": "vitest --typecheck"
运行pnpm run test:type运行测试
可视化
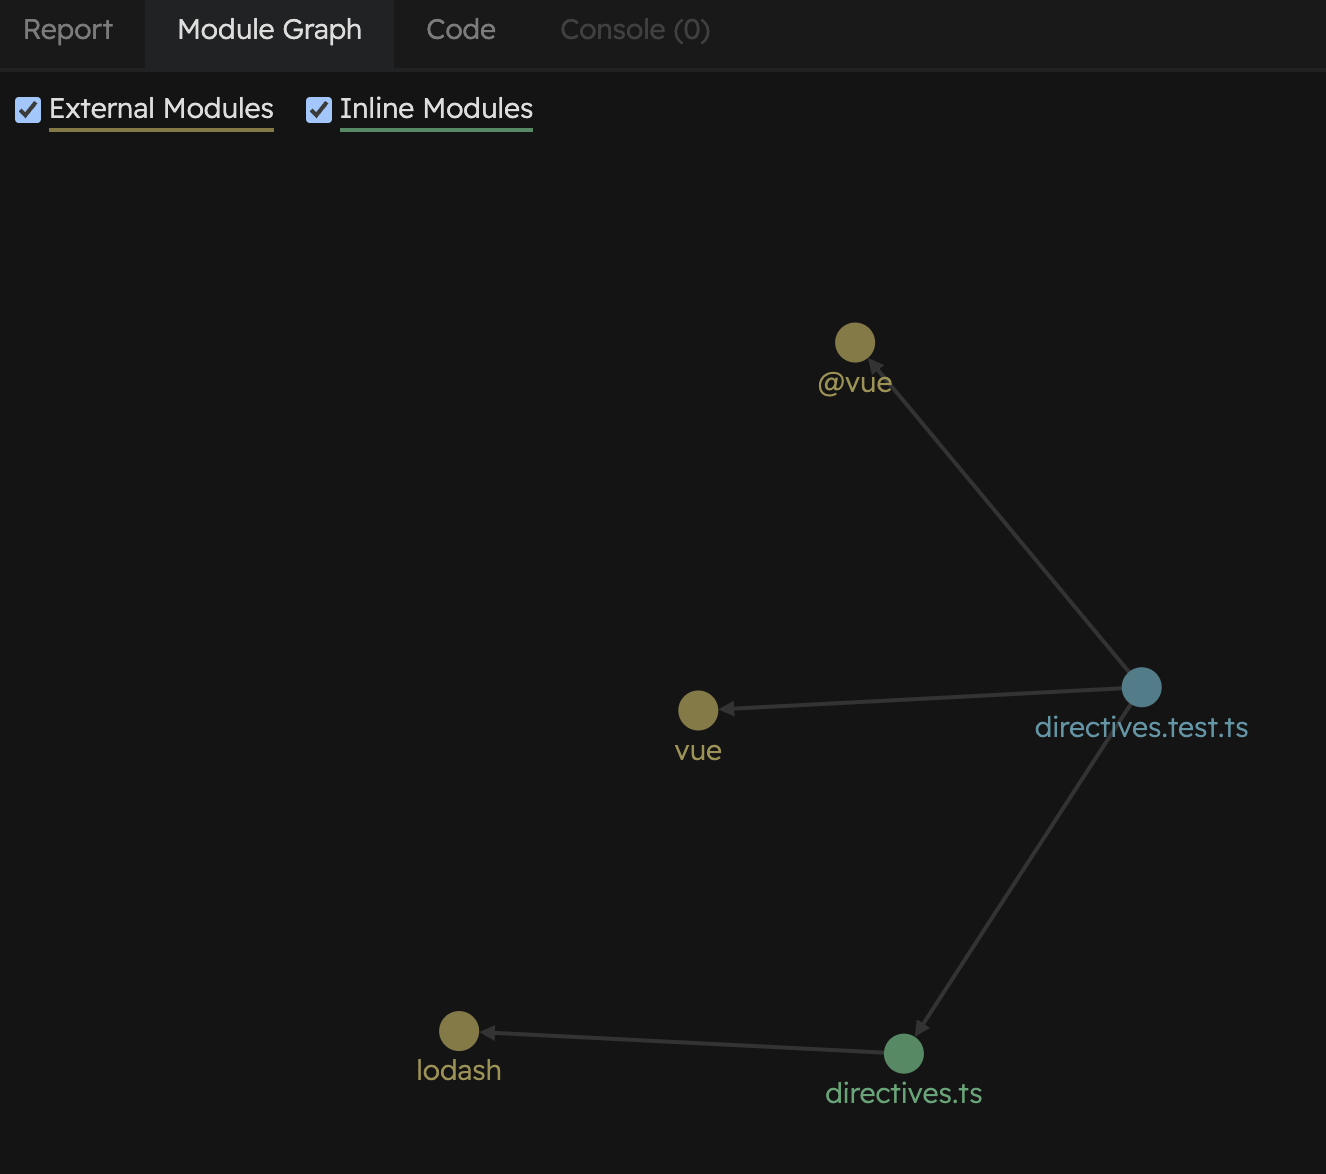
Vitest 提供了 UI 界面进行交互, 运行pnpm install @vitest/ui安装, pnpm run test:unit --ui 启动
 里面涵盖了几乎所有的操作, 还可以查看 console、源码和依赖图.
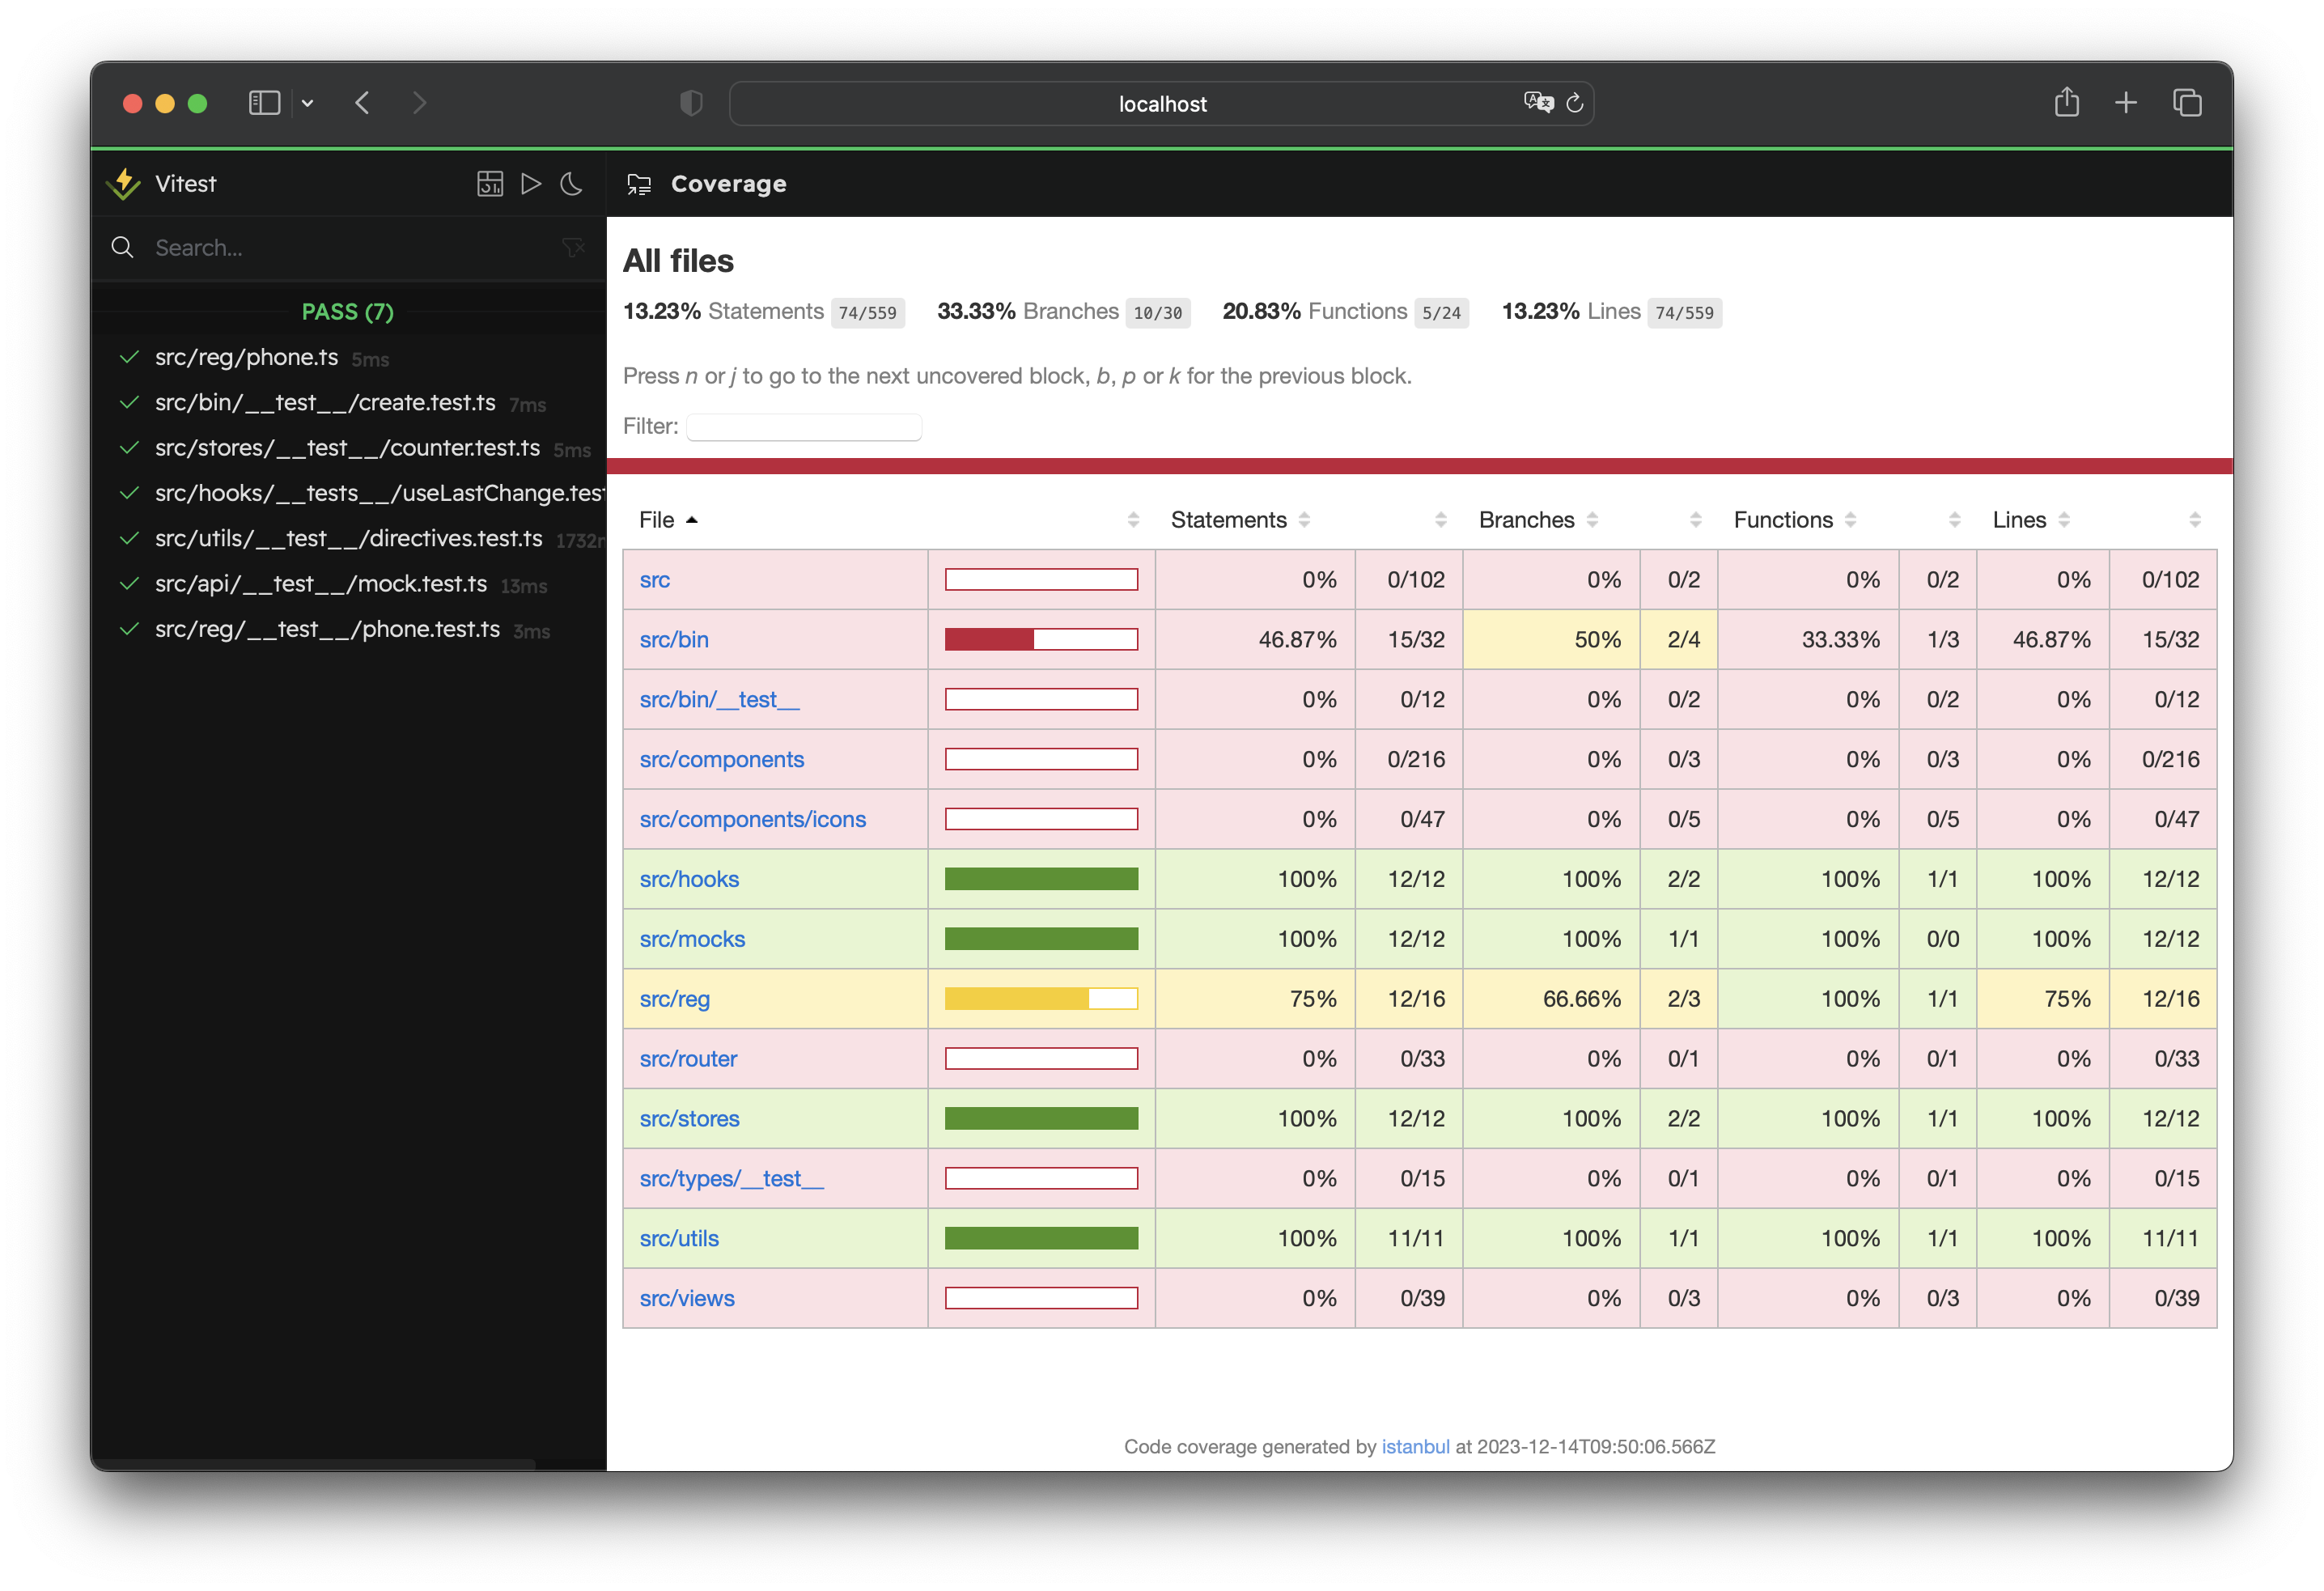
代码覆盖率
Vitest 通过 V8 提供代码覆盖率检查, 运行pnpm install @vitest/coverage-v8安装
在 vitest.config 中配置覆盖率选项
defineConfig({
  test: {
    coverage: {
      enabled: true,
      reporter: ['html']
    }
  }
})
这样就可以在 ui 界面上看到代码覆盖率结果了