如何实现一个在线 mock 服务
有不少 SaaS 服务提供了在线 mock 服务,比如 Apifox、Insomnia,不过他们首先是一个 API 设计工具,其次才是 mock 服务。
如果你只是要为 demo 提供接口,或者在后端完成工作前创建假数据,那他们的工具太重了。
更重要的是他们只会为商务用户提供 self-host 服务,对于普通开发者并不是很友好。
接下来我会介绍如何使用 Node.js、MongoDB、Faker.js 实现一个自己的在线 mock 服务。
你可以在https://github.com/Ray-D-Song/faker-server找到项目的代码,这是一个比较完整的实现
在线演示:https://faker-preview.jenrays.com/ 只读权限密钥: 1234
功能目标
- 创建、编辑、删除接口数据
- 基础鉴权能力
数据结构
首先我们要实现的并不是一个 json server,你不能让用户输入一个 json 内容,然后直接返回,这样没有任何意义。
设计参考应该类似 Apifox,用户可以在界面上输入接口路径、方法、描述,再创建结构化的接口返回值定义。
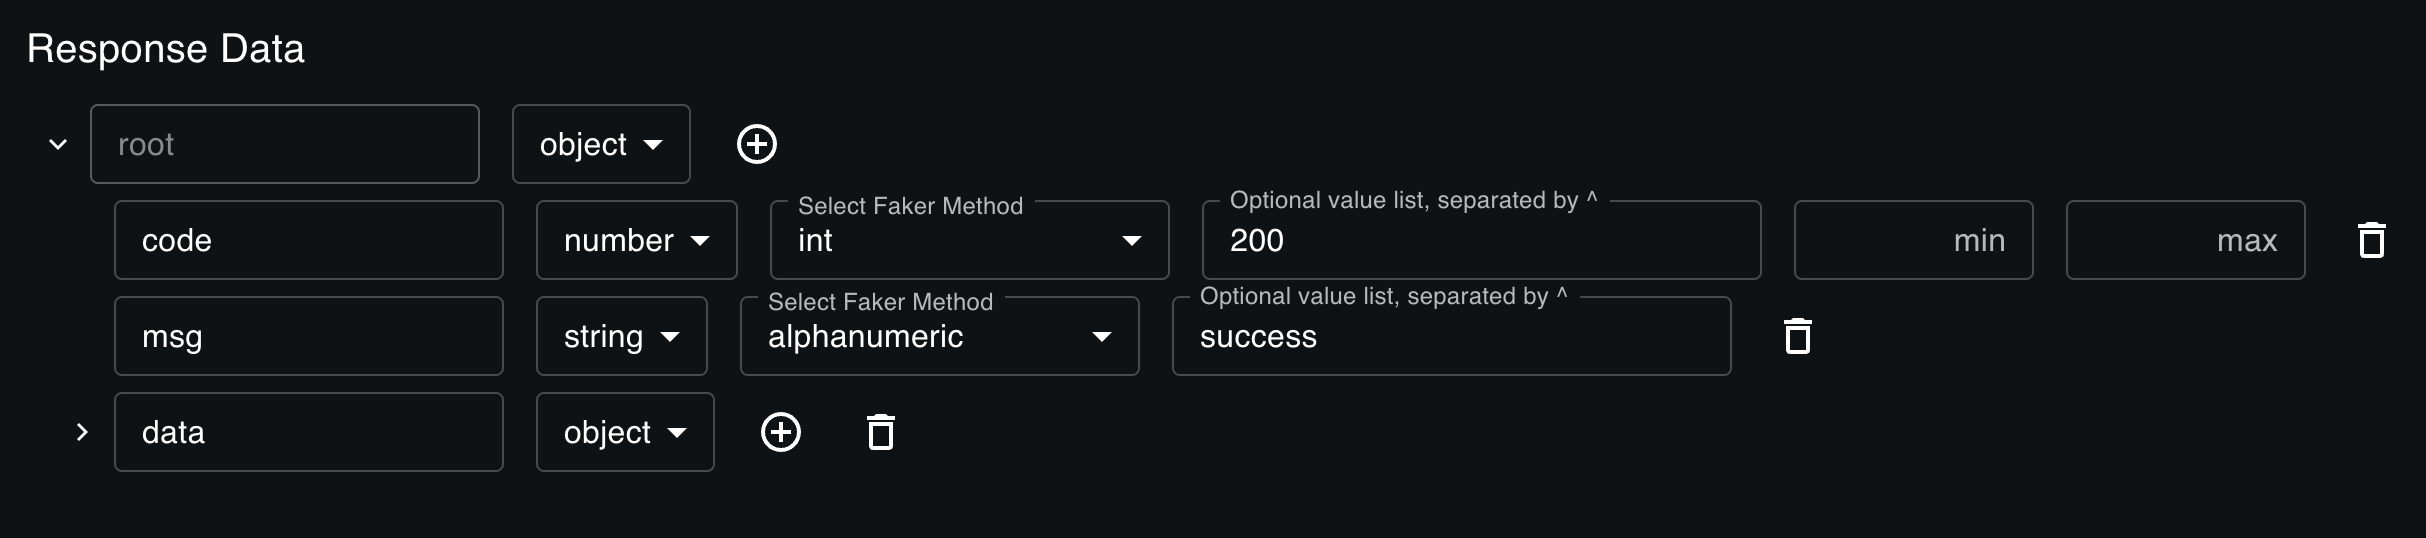
以 RESTful 接口为基准,数据结构应该是一个树,存在一个根节点root,根节点的类型可以是object或者array。
如果是 array,那需要有个字段记录数组的目标长度,这在mock分页接口时非常有用。
接下来要思考如何定义每个子节点,也就是 json 中的 key-value 结构。
比如用户需要这样一个用户信息接口/user,返回一个用户信息对象:
{
  "name": "Ray",
  "age": 20,
  "grade": "junior",
  "hobbies": ["reading", "traveling", "coding"]
}
json 的 key 由用户直接输入,value 会通过 faker.js 生成,那就需要记录每个 key 对应的 faker 方法。
比如生成人名对应的方法是faker.name.fullName。
grade 对应的值是junior、middle、high,这是一个枚举值,需要将用户输入的值转换为规范的值。
那我们就需要记录可选值列表,以及返回值本身的数据类型。因为有些时候需要的是数字 1、2、3,而不是字符串”1”、“2”、“3”。
既然有数字,那就会有最大值和最小值,比如年龄,总不能生成一个 1000 岁的用户。
基于以上分析,我们可以定义树的每个节点:
// 树的每个节点
interface Node {
  // 属性名, 比如 name: 'Ray' 中的 name
  key: string
  // 类型, 比如 string
  type: string
  // mock 方法, 比如 faker.name.fullName
  mock: string
  // 子节点
  children?: JsonNode[]
  // 数组长度(仅在 type 为 array 时有效)
  length?: number
  // 固定值
  value?: string
  // 最小值(仅在 type 为 number 时有效)
  min?: number
  // 最大值(仅在 type 为 number 时有效)
  max?: number
}
功能实现
设计完数据结构,就已经成功一半了。
接下来要考虑的是如何实现这些功能。
服务实际上分为两部分:
- 数据管理,包括创建、编辑、删除接口数据
/api/* - 接口 mock,根据接口路径、方法,返回相应的 mock 数据
/mock/*
数据管理 CRUD
最终我们存到数据库里是以接口为单位,每个接口包含路径、方法、描述、返回值定义(前面的节点树结构)。
interface Api {
  // 接口 id
  id: string
  // 接口路径
  path: string
  // 接口方法
  method: string
  // 接口描述
  description: string
  // 接口返回值定义
  data: Node[]
}
你可以使用任何你喜欢的数据库,如果用 sqlite 或者 pg、mysql 等关系型数据库,那树形的data字段就需要序列化成字符串/jsonb存储。
所以我推荐使用 MongoDB,它原生支持树形结构。
我选用的 web 框架是 Hono,一个支持多个 serverless 平台的轻量级框架。
以创建接口为例:
const crudApp = new Hono<{ Bindings: Bindings }>()

// 匹配 POST /create
crudApp.post('/create', async (c) => {
  // 读取请求体中的接口数据
  const api = await c.req.json<Api>()
  // 从ctx中读取数据库
  const db = c.get('db')
  const collection = db.collection<Api>('apis')

  // 检查接口是否已存在
  const existingApi = await collection.findOne({
      path: formatPath(api.path),
      method: api.method,
      deleted: { $ne: true },
  })
  // 如果接口已存在,返回错误
  if (existingApi) {
    return c.json({ error: 'API already exists' }, 400)
  }

  // 插入接口
  const result = await collection.insertOne({
    ...api,
    path: formatPath(api.path),
    createdAt: new Date(),
    updatedAt: new Date(),
  })

  // 如果插入成功,返回创建的接口
  if (result.acknowledged) {
    const createdApi = await collection.findOne({ _id: result.insertedId })
    return c.json(createdApi, 201)
  }
  // 插入失败,返回错误
  return c.json({ error: 'Failed to create API' }, 500)
})
如果你用express,那核心代码一模一样,只是路由组织方式不同,不再赘述。
接口 mock
mock 接口的处理流程如下:
- 接收
/mock开头的请求, 比如GET /mock/user - 以请求方法和路径作为查询条件,查询数据库中对应的接口数据
- 根据接口定义中的数据结构,生成 mock 数据并返回
其中最关键的是第三步,如何根据接口定义中的数据结构,生成 mock 数据。
因为是树形结构,所以需要递归处理。
同时又有许多细节需要兼顾,比如枚举类型需要随机选择一个值,如果 type 是’number’那需要在返回前进行转化,数字类型需要考虑最大最小值。
我们从底向上来处理这个问题,首先是根据 mock 字段的值调用 faker.js 生成数据。
编写一个 fake 方法:
interface FakeOptions {
  min?: number
  max?: number
}

/**
 * @param key - 比如 faker.name.fullName
 * @param options - 比如 { min: 18, max: 60 }
 */
function fake(key: string, options?: FakeOptions) {
  // 根据.分割字符串
  const parts = key.split('.')
  let currentObject: any = faker

  for (const part of parts) {
    // 检查当前对象是否存在该方法
    if (typeof currentObject[part] === 'function') {
      let result: any
      // 如果有额外选项,则调用方法时传入
      if (options) {
        result = currentObject[part](options)
      } else {
        result = currentObject[part]()
      }
      // 检查结果是否为 BigInt, 如果是则转换为字符串, 不然 JSON.stringify 会报错
      return typeof result === 'bigint' ? result.toString() : result
    } else if (currentObject[part] !== undefined) {
      // 继续处理下一层
      currentObject = currentObject[part]
    } else {
      throw new Error(`生成模拟数据失败: ${key}`)
    }
  }

  throw new Error(`生成模拟数据失败: ${key}`)
}
然后我们就可以根据节点树生成 mock 数据了。
编写processResBody方法:
/**
 * 处理返回值
 * @param body - 节点树
 */
function processResBody(body: Node[]): any {
  // 处理单个节点的逻辑
  function processNode(node: Node): any {
    if (node.value !== undefined && node.value.trim() !== '') {
      // 如果设置了非空的特定值,将其分割成可选值数组
      const options = node.value.split('^').map((v) => v.trim())
      // 随机选择一个值
      const selectedValue = options[Math.floor(Math.random() * options.length)]

      // 根据类型进行转换
      switch (node.type) {
        case 'number':
          return Number(selectedValue)
        case 'boolean':
          return selectedValue.toLowerCase() === 'true'
        case 'null':
          return null
        case 'object':
        case 'array':
          try {
            return JSON.parse(selectedValue)
          } catch {
            console.warn(
              `无法解析 ${node.key} 的值为 ${node.type},使用原始字符串`,
            )
            return selectedValue
          }
        default:
          return selectedValue
      }
    }

    // 处理不同类型节点
    switch (node.type) {
      // 对象类型,递归处理每个子节点
      case 'object':
        const obj: { [key: string]: any } = {}
        node.children?.forEach((child) => {
          obj[child.key] = processNode(child)
        })
        return obj
      // 数组类型,根据长度生成对应数量的子节点
      case 'array':
        const arr: any[] = []
        const length = node.length || 1
        for (let i = 0; i < length; i++) {
          arr.push(
            processNode(
              node.children?.[0] || {
                key: 'item',
                type: 'string',
                mock: 'string.alphanumeric',
              },
            ),
          )
        }
        return arr

      // 其余类型调用 fake 生成数据
      case 'number':
        let options: FakeOptions = {}
        if (node.min) options.min = Number(node.min)
        if (node.max) options.max = Number(node.max)
        return fake(node.mock, options)
      case 'string':
      case 'boolean':
        return fake(node.mock)
      case 'null':
        return null
      case 'any':
        return fake('datatype.json')
      default:
        return undefined
    }
  }

  // 从根节点开始处理
  return processNode(body[0])
}
不难看出,processResBody方法的核心就是自递归,根据不同的类型调用不同的处理逻辑。
接下来就是将processResBody方法集成到 mock 接口的路由中,和前面的数据管理路由类似,不再赘述。
基础鉴权
因为是 web 服务,所以不能完全开放,总不能谁都能创建、删除、修改接口。
这里也不再引入额外的复杂度,做多租户,直接用一个KEY字段来鉴权。
具体来说,在服务首次启动时,生成一个配置文件.env,其中包含一个KEY字段,其值为一个uuid。
客户端设置一个自定义的Faker-Server-Key请求头,在每次请求时带上该请求头,然后在路由处理中验证其值是否等于配置的KEY。
服务端每次启动时都会读取这个文件,所以每次修改KEY后需要重启服务。
由此还可以衍生出只读 KEY,ADMIN KEY,前者只能用于查询,后者则可以用于所有操作。
以及访问 mock 服务专用的ACCESS KEY,可以设置过期时间,或者调用频率限制。
// 生成默认配置
function generateDefaultConfig() {
  // 检查配置目录是否存在
  if (!fs.existsSync(configDir)) {
    fs.mkdirSync(configDir, { recursive: true })
  }

  // 检查配置文件是否存在, 不存在则创建
  // 生成三个 UUID 作为 KEY
  if (!fs.existsSync(configFile)) {
    const accessKey = crypto.randomUUID()
    const adminKey = crypto.randomUUID()
    const readonlyKey = crypto.randomUUID()
    const defaultConfig = `
# Server Port
PORT=3000

# Access /mock/* API
ACCESS_KEY=${accessKey}

# If true, the server will allow public access to the /mock/* API
# /api/* will continue to require authentication
PUBLIC_ACCESS=false

# ADMIN_KEY is used to access the web page and modify the data
ADMIN_KEY=${adminKey}

# READONLY_KEY can access the web page, but cannot modify the data
READONLY_KEY=${readonlyKey}

# MongoDB URL
MONGO_URL=mongodb://admin:password@localhost:27017?authSource=admin
`.trim()

    // 写入配置文件
    fs.writeFileSync(configFile, defaultConfig)
    console.log('Created default configuration file at:', configFile)
  }
}
总结
这并不是一个手把手的教程,只是提供一个思路,具体的实现可以参考https://github.com/Ray-D-Song/faker-server。
尤其是前端的部分没有涉及,项目使用的是 React 和 MUI,可以看packages/client目录。